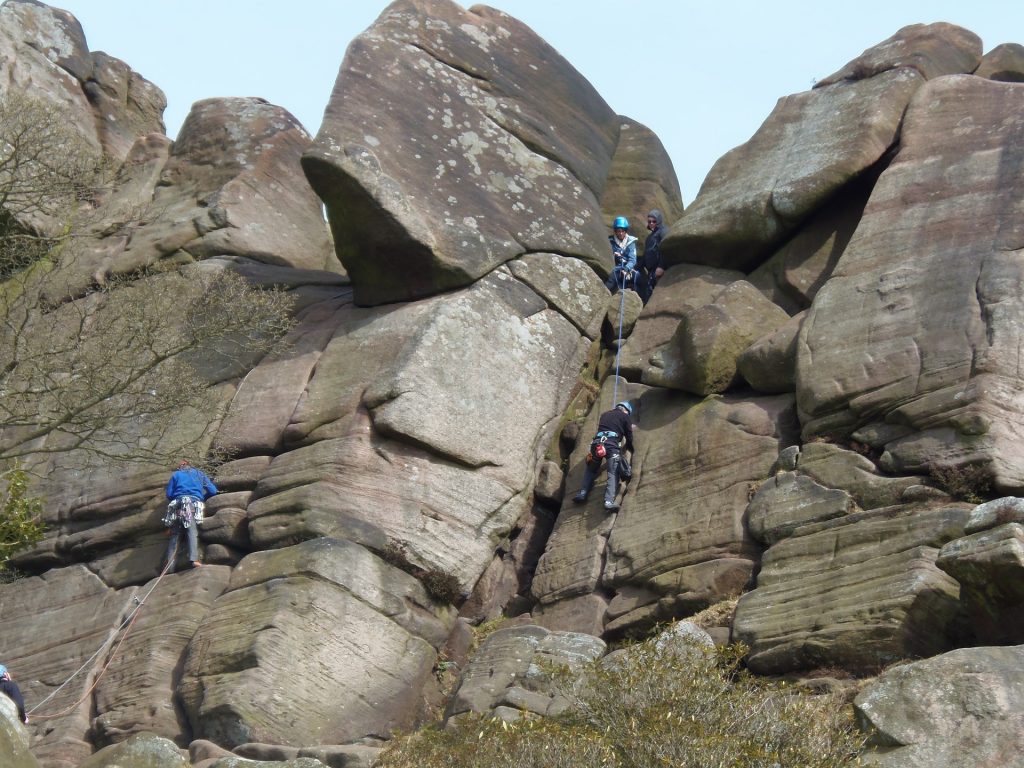
Rock climbing is an extreme sport. Every lead climber relies on the belayer for their safety. It’s in the hands of the belayer to safely catch the climber when they fall. An acute sense of focus and concentration is required to be prepared at all times.
The art of lead belaying requires you to pay attention to any mistake the climber might make and communicate effectively with them, this along with not interfering with the smoothness of their climb throughout the tread. This activity is not just about feeding the rope in, taking in the slack, and catching the falls. It requires perfect coordination and communication skills. The lead climber’s life lies in the hands of the belayer. If the rope is the lifeline, the belayer is an angel that grants rope.
What is Lead Belaying?
A lead belayer stands at the foot of the climb when the lead climber is ascending and performs these tasks
- Managing and Inspecting the rope.
- Giving out slack and taking in slack as and when required.
- Paying attention to the lead climber, noticing any crucial mistakes or errors and communicating them.
- Staying alert and prepared to catch a fall at any time
- Being quick in action: Any delay could cost the lead climber their life!
Duties of a Lead Belayer
Lead belaying is quite different from Top rope belaying. This is a prerequisite for safety when it comes to climbing whether outdoors or in the gym and requires certification.
The first step of belaying is to securely tie up the climber and yourself to the rope. A figure of eight knot is used to tie the climber to the rope and after giving out some slack, the belayer also ties themselves. This step is important and crucial because any loose knots or loose equipment in the way between the climber and the belayer could gravely compromise their safety.
The belayer should maintain a strict posture that allows them to ready into any required stance at any time during the climb. A balanced stance will help the belayer catch the climber at the right time in case they fall. The belayer’s feet should be shoulder width apart and one foot of theirs should be in a lunge position with the knees bent slightly. The foot bent in the front should be located opposite to the hand that holds the brake.
It is essential for the belayer to be positioned close to the wall so that when the climber falls, they can use the wall to support themselves while staying close to the wall also provides more length of the rope to the lead climber. A greater distance from the wall would mean that a greater length of rope will have to be released by the belayer.
The management of the rope in lead climbing is quite different from top rope climbing. In top rope climbing, the belayer has to constantly take in slack as the climber ascends whereas in lead climbing, the belayer has to constantly release more slack as the climber progresses upward.
You have to be prepared to catch the climber during the initial clips because the height of fall is less and it may be difficult to land safely in case the climber slips. The trick is to keep the brake hand ready at all times while feeding in more rope through the belay device so that the lead climber always has enough length of rope to use a quickdraw.
The length of the rope available to the climber and the length required to pull them back safe from a fall has to be kept balanced. The rope shouldn’t be tight in any scenario.
While managing the rope, it is the duty of the belayer to inspect the rope for any flaws that may prove dangerous on the route. The rope has to be flaked and straightened before the climb is begun so that there are no knots, or obstacles that could hinder a smooth progress upward.
You should be alert and stay focussed on the movements of the climber. They should be observed while they are clipping and should be warned if they are back clipping or z clipping or if their leg is interfering with the movement of the rope. A belayer should keep the climber safe throughout the tread and communicate whenever there seems to be a problem.
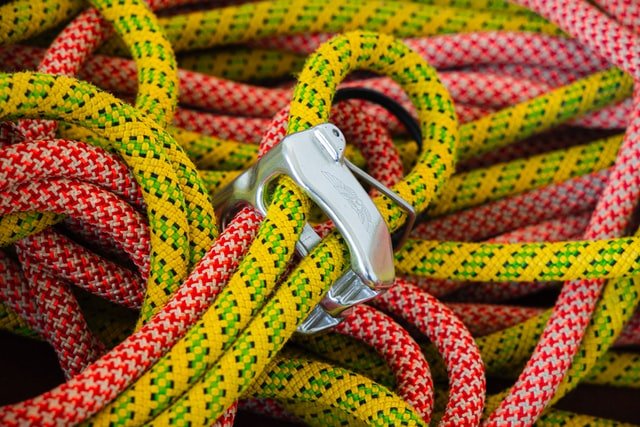
Gear needed for Lead Belaying
A lead belayer needs three main equipment to follow the many steps in lead belaying.
Belay Device
The market has various types of belay devices for you. A belay device is a mechanical equipment that functions to control the rope during belaying. The safety of the climber is enhanced by a reduction in the physical effort of the belayer in managing ropes and stopping the fall. Belay devices offer a friction brake so that any fall of the lead climber can be stopped with the slack in the climbing rope.
The rope moves freely when it is held outward and away from the body. But when it is brought close and backward and pulled to the side of the body, the rope is forced to pass through bends and to tightly rub against the device which halts the fall of the climber.
Belay devices are attached to the belt of the lead belayer with the help of a carabiner.
Carabiner
A carabiner serves to connect your belay device to your harness and takes control of the position of your belay device. Some modern carabiners even take part in providing additional friction that helps during the lowering of the climber.
Climbing Rope
Lead climbing relies on the strength and flexibility of the climbing rope. A proper dynamic rope is preferable for lead climbing as it can reduce the impact of falls due to its stretching ability and its unique quality of absorbing energy.
It is not advisable to use static ropes for lead climbing as they would not stretch while bearing a load and could prove dangerous in the event of a fall. Their sole purpose could be for lifting up gear through the route.
Helmet
Wearing a helmet shouldn’t be a matter of choice. It is important to save your life at whatever cost. Your head should be safe from bumping into protrusions on the route and from getting severely injured in case the climber sustains a fall. A belayer must wear a helmet to remain protected from the rocks falling down as the climber ascends.
Gloves
It is optional to wear belaying gloves but advisable. These gloves will protect your hands from incurring blisters and rope burns while belaying and lowering the lead climber.
Lead Belaying Principles
- Your brake hand should always be placed on the rope.
- Your hand should slide only when the rope is firmly held in the position of braking.
- Your brake hands should be oriented in their strongest natural position.
- You should pay attention to the climber and watch for any difficulties that may arise.
Lead Belaying Technique
First, the belay system is set. A figure of eight knot is used to tie the climber to the rope and a stopper knot is tied by the belayer at the end of the rope so that the system is closed.
A ground anchor is set in place in case the climber is heavier in weight than the belayer.
Before starting the climb, the belayer checks if the length of the rope is twice as long as the distance to the top. This is important to ensure there is enough rope left to lower the climber back to the ground. The rope has to be straightened and flaked and checked for any irregularities that may prove dangerous later on.
A safety check has to be performed by the climber and belayer before beginning the climb. The figure of eight knot and the stopper knot have to be verified.
The buckles of the harnesses have to be checked for proper fastening. It is essential that the straps double back through the buckles while being secured.
Make sure that your belay device is properly threaded and that your carabiner is locked.
Your communication commands need to be revised before the climb is begun.
Belaying begins when the climber clips into the first bolt of the tread. The belayer’s task is to spot the climber as they ascend to that point. The belayer’s balanced stance makes his arms upright and fingers straight to be prepared and prevent a fall. If a fall occurs, the belayer has to ensure that the climber is upright and their head doesn’t hit the ground.
When the first bolt is clipped, the belayer should take the proper belaying stance. Assuming the standard belay stance is critical because you can at times get thrust forcefully into a wall while constantly looking up and belaying. Standing close to the wall is essential so that you don’t crash into it from far behind and sprain your ankle or cause an injury in the process. Everytime the climber clips, get ready to stop a fall.
Communicate correctly and effectively while belaying. Understand and follow commands quickly.
Paying out slack
Your rope should be tightly gripped with your guide hand positioned above the belay device. Your brake hand should be slided away from the belay device as you make a tight grip on the rope.
Feed slack by giving the rope upward with your guide hand.
At the same time, your brake hand should grip the rope in a position closer to the belay device.
Your guide hand should be slided down above the device when the rope has been given away as slack and should again grip the rope firmly.
Your brake hand should not interfere when your guide hand firmly grips the rope.
The above sequence of movement has to be performed in a flow for as long as the climber is ascending upward.
Monitoring the length of rope slack
If the slack is less in length, a climber could fall off the wall for the deficit. A length of slack more than the required amount would mean that the climber will sustain a long and dangerous fall in the event of an accident.
The amount of rope leading out of the belay device should be noticed at all times. If the rope is as straight as a wire as it comes out of the device and moves upward, your slack is deficient. If the length of the rope droops below the belaying device, that means you have extra slack.
Your climber should be watched and listened to continuously as you belay. When they stop, you stop. When they signal that they are clipping, you supply slack. Your footwork should coordinate with your hand movements so that you step forward.
Making a hard catch
When it seems that the climber is about to fall due to an obstruction, take a few steps close to the wall so that you can quickly apply the brake and hold the fall.
Tighten your grip and pull your brake hand down to fight the fall as your body, rope, harness, and the belay device work together to absorb and work with the force of the fall.
The lead belayer will be pulled upward or toward the wall when the force of the fall is great. It is advisable to brace your feet against the wall by bending your knees.
Making a soft catch
When it doesn’t seem that the climber is about to hit a fall or is close to a probable obstruction, stay put at your initial position a little away from the wall so that you have space to step ahead and fight when you have to stop the fall.
Your own body’s movement and the natural elasticity of the rope will be used to halt the accident.
For this, pull with your brake hand and tighten your grip. In case of a long fall, jump toward the wall to make sure the force of the fall doesn’t drag you on another rocky portion.
The fall’s full force can pull you up in the air, so your feet should be braced against the wall, knees should be bent, and you should move upward to halt the fall by standing against the force.
Conclusion
Lead belaying requires training and certification. This article should supplement your knowledge, not serve as a guide when you step outdoors to ascend.
We hope you pay attention and act right as you rise higher.